XenForo Enhanced Search is a powerful extension that leverages Elasticsearch to deliver faster and more accurate search results. This guide walks you through the steps of installing and configuring Elasticsearch 8 on a Linux server for use with XenForo Enhanced Search.
Elasticsearch 8 requires Java 11 or newer.
Verify the installation:
Import the GPG key:
Create the repository configuration file:
Install the package:
IMPORTANT!!!
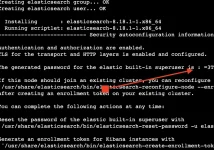
After installation, the system will generate a password for the built-in elastic user and configure HTTPS and user authentication by default. Save the generated password.
If you missed the password, you can reset it later with:

Enable Elasticsearch to start on boot:
Verify it is running:
If successful, it will return a JSON response with cluster details.
In your XenForo Admin Control Panel:

Click Test settings to verify the connection. If successful, save the settings.
Go to:
Tools > Rebuild Caches > Rebuild Search Index
This process will populate your Elasticsearch index with your forum content.

Thats all!
System Requirements
- A Linux server (CentOS, AlmaLinux, or CloudLinux recommended)
- Root or sudo access
- XenForo 2.2 or later with Enhanced Search add-on
- Java 11 (OpenJDK)
- 2GB RAM minimum (4GB recommended)
Step 1: Install Java
Elasticsearch 8 requires Java 11 or newer.
Code:
sudo dnf install -y java-11-openjdk-develVerify the installation:
Code:
java -versionStep 2: Add Elasticsearch GPG Key and Repository
Import the GPG key:
Code:
sudo rpm --import https://artifacts.elastic.co/GPG-KEY-elasticsearchCreate the repository configuration file:
Code:
cat <<EOF | sudo tee /etc/yum.repos.d/elasticsearch.repo
[elasticsearch]
name=Elasticsearch repository for 8.x packages
baseurl=https://artifacts.elastic.co/packages/8.x/yum
gpgcheck=1
gpgkey=https://artifacts.elastic.co/GPG-KEY-elasticsearch
enabled=1
autorefresh=1
type=rpm-md
EOF
Step 3: Install Elasticsearch
Install the package:
Code:
sudo dnf install -y elasticsearchIMPORTANT!!!
After installation, the system will generate a password for the built-in elastic user and configure HTTPS and user authentication by default. Save the generated password.
If you missed the password, you can reset it later with:

Code:
/usr/share/elasticsearch/bin/elasticsearch-reset-password -u elasticStep 4: Enable and Start Elasticsearch
Enable Elasticsearch to start on boot:
Code:
sudo systemctl daemon-reload
sudo systemctl enable elasticsearch.service
sudo systemctl start elasticsearch.service
Verify it is running:
Code:
sudo systemctl status elasticsearch
Code:
curl -u elastic:'yourpassword' https://localhost:9200 --insecureIf successful, it will return a JSON response with cluster details.
Step 6: Configure XenForo Enhanced Search
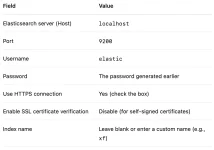
In your XenForo Admin Control Panel:
- Go to Setup > Options > Search Options
- Click Configure Enhanced Search

Click Test settings to verify the connection. If successful, save the settings.
Step 7: Rebuild Search Index
Go to:
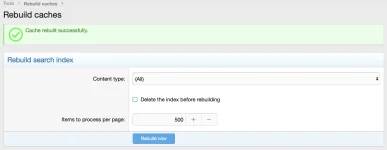
Tools > Rebuild Caches > Rebuild Search Index
This process will populate your Elasticsearch index with your forum content.

Thats all!
